DIY Thanksgiving: 5 Uses for Patterned Papers

Thanksgiving happens to be one of the favorite holidays among our team. Something about the cold air, gathering of families, and cooking together warms our hearts. While it's meant to be a time to reflect and give thanks, sometimes the preoccupation with the perfect holiday decor takes its toll. We're flooded with images of the fanciest table tops and gourmet recipes, but not all of us have the time (or budget!) to go all-out for the big feast. If you are the lucky one hosting Thanksgiving this year and are looking for affordable, simple, and festive decor, our patterned papers are a great go-to. We've come up with 5 uses for patterned papers that you can make in no time, and just in time for your guests to arrive. Shown here is our classic Marquee pattern, but there are lots to choose from!

1. Patterned Paper Jar Lids: You may have to fight for the leftovers, but sending friends and family members home with equal portions is a great way to share. Or, send them home with a hand-made treat as a thanks-for-coming favor. Simply cut a 4.5" square (or 5.5" square for wide-mouth jars) of patterned paper. Place the metal lid cover over the jar, then set your paper square on top. Twist the screw-on cap over the paper and lid to ensure closure. You may need to press hard!

2. Patterned Paper Napkin Rings: The possibilities are endless here. With a starter shape of 1.5" x 7" you can double the napkin ring as a personalized place card by gluing a .5" x 2" piece of paper on top. Or, take a 2.5" x 8" strip, cut out a leaf shape on one end, and trim the other end to 1" wide. Apply glue to 1/2" of one side and seal under the other.

3. Patterned Paper Thankful Chain: Keep the kids busy or adults guessing with this paper Thankful Chain! It's a new twist on the Christmas paper chain, with a whole new meaning. Cut 1.5" x 7" strips of paper and ask your guests write a few things they are thankful for on one side. Glue one end of the strip under the other end and repeat, looping the next strip through your first chain. When assembled, hang above the table for decor or spread around the table. Throughout the meal you (or the kids) can read each strip and reflect - make it a game and guess who said what!

4. Patterned Paper drink flags/stirrers: Every party needs some of these. Celebrate the autumn weather by cutting your flags into leaf shapes. Start with a 1.5" x 5" strip and fold in half. Open it back up, draw your shape on one half of the blank side of the paper, fold in half again, then cut out. Reverse the fold, apply glue to one side, place a skewer or straw in the center then hold to adhere.

5. Patterned Paper Place Card Holders: Thanks to Martha Stewart for this idea, keep things simple with a folded paper place card holder. We scaled ours down to a 3" x 3.75" piece of paper, folded in half, then folded in half again, creating three 3/4" folds. Unfold the paper, and reverse one fold, making an "M" shape. Place your place card inside and voila!

For more pretty patterned paper ideas and DIY crafts, visit our website here!


DIY Patterned Papers: Favors

We're feeling a lot of love for our new DIY Collection and one of our most exciting additions is the selection of patterned papers that match your favorite wedding suites. The papers, all 8.5 x 11" and printed on smooth, 80-lb text weight paper are the perfect way to add finishing touches on your big day, from paper drink flags to napkin rings. To add to our series of DIY wedding crafts, we're bringing you easy and adorable paper favors.  These can also be doubled as place cards or escort tags!

These mini paper bags are the simplest way to provide favors for your guests, but there are many ways you can dress them up to match your decor. You can find them in various colors at your local craft supply store, and they come in large and small sizes. They make the perfect grab bag for a casual wedding filled with local treats or handmade gifts. Instructions below!

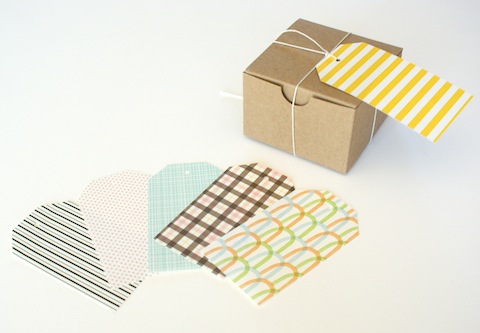
Mini cardboard boxes may be the most traditional wedding favors around, but they are as versatile as they are practical. We wrapped our patterned paper around them and secured with a label or ribbon to make them match. If you want to get extra crafty, you can even make a favor box out of the patterned paper! Use this favor box template to trace.

And last but not least are these easy tea bag tags. You can wrap them to almost any object, and they can be dressed up or dressed down with some fancy calligraphy or alphabet stamps. Use this favor tag template for easy tracing.

Paper Bags:

Materials: 3.5" x 2" x 6.75" Paper Bags, Patterned Paper, Glue, 1/8" Hole Punch, Ribbon or Twine, Scissors

How To: Cut your patterned paper into 2.5" x 3.5" rectangles. Insert your favor into the bag and fold the top 1.25" down toward the back. Fold your patterned paper in half (the long way - or hot dog style!) Apply some glue to the back side of your patterned paper and stick to both sides of the folded bag. Punch a hole 1.5" from both sides. Loop your ribbon or twine from the back and tie a square knot or bow. Cut the ends of the ribbon at 45 degree angles.

Adhesive Labels:

Materials: 3.5" x 2" x 6.75" Paper Bags, Patterned Paper, Glue, Label Paper, Washi Tape or Stickers

How To: Cut your patterned paper into 2.75" x 3.5" rectangles. Glue to your paper bag. Print a 2.25" x 3" label on label paper and stick on top of your patterned paper. Stuff with a favor and fold 1" from the top. Seal with washi tape or a sticker.

Mini Cardboard Box Wrap:

Materials: 3" x 3" x 2" Boxes, Patterned Paper, Glue or Double-Sided Tape, Label Paper or Ribbon

How To: Cut a 1" x 11" or 1.5" x 11" strip of patterned paper. Wrap around the box and secure with double sided tape or glue. Add a personalized label or piece of ribbon and tie.

Mini Paper Favor Box:

Materials: Patterned Paper, Pencil, Scissors, Glue, Template

How To: Cut out the template with scissors and trace onto the back of your patterned paper. Cut with scissors and fold in places of dotted lines. Apply glue on the two labeled tabs and fold pieces together so the "top" and "bottom" squares are in place.

Tea Bag Tag:

Materials: Patterned Paper, Scissors or Craft Knife, Pencil, Ruler, 1/8" Hole Punch

How To: On the back of your patterned paper, draw a 2" x 3.5" rectangle with a pencil and ruler. Cut out with scissors or craft knife. Cut 1/2" corners off the ends of one side. Punch a hole 1/2" from the top and 1" from the sides to center. Loop with ribbon or twine and tie to your favors! Use this handy template for easy tracing!

Shop all patterned papers here, and to view more paper DIY projects, visit our website!

DIY Patterned Papers: Drink Flags

The next video in our DIY Paper Details series is our favorite reception accessory - DIY Drink Flags! There are three easy templates for making festive flags for your party drinks. Your guests will certainly see your details come together if you match your papers with your wedding invitations or table numbers. Watch the video or see below for full instructions!

DIY Drink Flags from Hello!Lucky on Vimeo.

 Materials:

DIY Drink Flag Template, Printer, 1 sheet cardstock, 8.5 x 11” (US) or A4 (UK), Ruler, Bone folder, or a butter knife, Cutting mat, or a magazine, Craft knife, Pencil, Patterned paper, Glue stick, Skewer sticks

How To:

Step 1. Print out the template. Print this template on card stock. Make sure your printer is set to 100% (or, “no scaling”) to ensure that the template prints to scale. Step 2. Cut out the template. Using a ruler, craft knife, and cutting mat, cut out the drink flag template. Step 3. Trace the template. With a pencil, trace the drink flag templates onto each sheet of pattern paper. Step 4. Cut out each flag. Using a ruler, craft knife, and cutting mat, cut out the flags. Step 5.  Fold each flag in half. Fold the flags in half and use a bone folder to smooth the crease, marking your center. Step 6. Glue in skewers. Apply glue to one side of the inside of your flags. Place the skewer stick in the center, leaving about ¼” space at the top. Fold and smooth to secure.

Fore more paper DIY projects visit our website!

DIY Patterned Papers: Belly Bands

DIY Belly Bands from Hello!Lucky on Vimeo.

The next video in our series of DIY Paper Details is DIY Belly Bands! These little strips of paper are a very practical and simple way to add some character to your wedding suite while keeping all your inserts together. With basic instructions like cutting lines and folding twice, you will be shocked at how easy the process is. Dress yours up with a nice ribbon tie or lace paper trim for a more elegant approach. Watch the video and see below for full instructions!

Materials:

DIY Bellyband Template, Printer, 1 sheet cardstock, 8.5 x 11” (US) or A4 (UK), Ruler, Bone folder, or a butter knife, Cutting mat, or a magazine, Craft knife, Pencil, Patterned paper (one sheet makes 4 bands), Glue Stick

How To:

Step 1. Print out the template. Print this template on card stock. Make sure your printer is set to 100% (or, “no scaling”) to ensure that the template prints to scale. Step 2. Cut out the template. Using a ruler, craft knife, and cutting mat, cut out the belly band template. Step 3. Trace the template. With a pencil, trace the belly band template onto each sheet of pattern paper. Repeat. One sheet of patterned paper fits 4 belly bands. Step 4. Cut out each belly band. Using a ruler, craft knife, and cutting mat, cut out the belly bands. Step 5.  Wrap the belly bands. Using a ruler and bone folder or butter knife, make a fold 3” on both ends of the band. Place each band in the center your invitation. Flip the invitation and band over. Apply about a ½” strip of glue to the back side of one end of your band. Set over the top of the other end and smooth to secure.

For more crafty paper projects, head over to the DIY section of our website here!

DIY Patterned Papers: Envelope Liners

DIY Envelope Liners from Hello!Lucky on Vimeo.

Do you remember our How To Assemble Your Wedding Invitations video? Well we had so much fun making it we just had to come up with more. With the launch of our new DIY Collection this is the perfect time to debut the first in a series of DIY Paper Details stop-motion videos. All videos were styled, directed, and filmed right here in our San Francisco studio and we couldn't be more excited to share them with you! Today we have DIY Envelope Liners. Using our bulk patterned papers and envelope liner templates, you can add these easy and cheerful liners to your wedding invitations in no time. Watch the video for full instructions or see below!

Lined Envelopes

To save time, photocopy this template onto the back of each of your patterned paper sheets and cut out each envelope liner (skip to Step 4).  If you don’t have access to a photocopier, follow the steps below to create your own template to trace.

You’ll Need:

DIY Envelope Liner Template, Printer, 1 sheet cardstock, 8.5 x 11” (US) or A4 (UK), Ruler, Bone folder or a butter knife, Cutting mat or a magazine, Craft knife, Scissors, Pencil, Patterned paper (1 sheet per envelope), Envelopes, Glue Stick

How To:

1. Print out this template on cardstock. Make sure your printer is set to 100% (or, “no scaling”) to ensure that the template prints to scale. 2. Using a ruler, craft knife, and cutting mat, cut out the envelope liner template. Use scissors to trim the rounded end. Hold the template up to your envelope to make sure it’s the right size - envelope liners need to slip neatly into the envelope and should align with the envelope flap but not cover the glue. If needed, adjust the template using your printer’s scaling options. 3. With a pencil, trace the envelope liner template onto each sheet of patterned paper. 4. Using a ruler, craft knife, and cutting mat, cut out the envelope liner. Use scissors to trim the rounded end. 5. Fold the flap down to crease the envelope liner, approximately where it says “fold here” on the template. With the flap portion of the liner folded down, apply glue. Fold the envelope flap down and smooth to secure.

For more pretty paper projects, head over to the DIY section of our website, here!

New DIY Collection!

Today we're happily announcing the release of our new DIY Wedding Collection! We know how important all the details of a wedding can be and how expensive it can all get. We're so excited to offer up some budget friendly alternatives that look beautiful and will let you put your own personal touch on your big day.

Our DIY collection includes letterpress printable cards and invitations, patterned papers, wedding craft projects, and free printable wedding signs for all your paper needs. They come in some of our most popular wedding designs like Nouveau Peonies and Heirloom Harvest, along with many others. You can shop our patterned papers and printables online but be sure to follow our blog for tutorials and inspiration for your craft projects!

Our free printable table numbers, guest book signs, and reserved seating signs can easily be printed at home on cardstock paper or mounted on a fun prop or accessory. Browse and download all wedding signs here!

These letterpress printable invitations are perfect for a small event like a rehearsal dinner or bridal shower. They are printed on 100% cotton luxe paper and will guarantee an expensive look for an affordable price. Shop all printable invitations here!

You can make your own paper details with matching patterned papers! We have great DIY templates and instructions for how to make all the best accessories like envelope liners and drink flags. All designs are customizable with 35+ ink colors to choose from. Shop patterned papers here!

We hope you're just as excited about our new DIY collection as we are. Let us know what you think and if there's anything else you'd like to see there in the future!

DIY Father's Day Cupcake Toppers

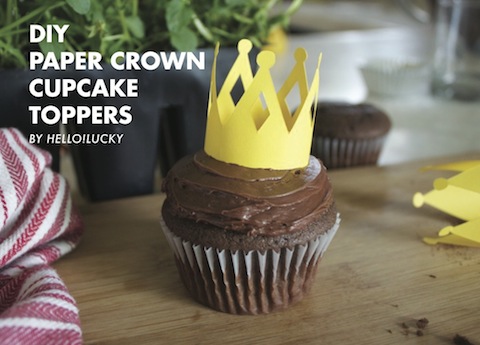
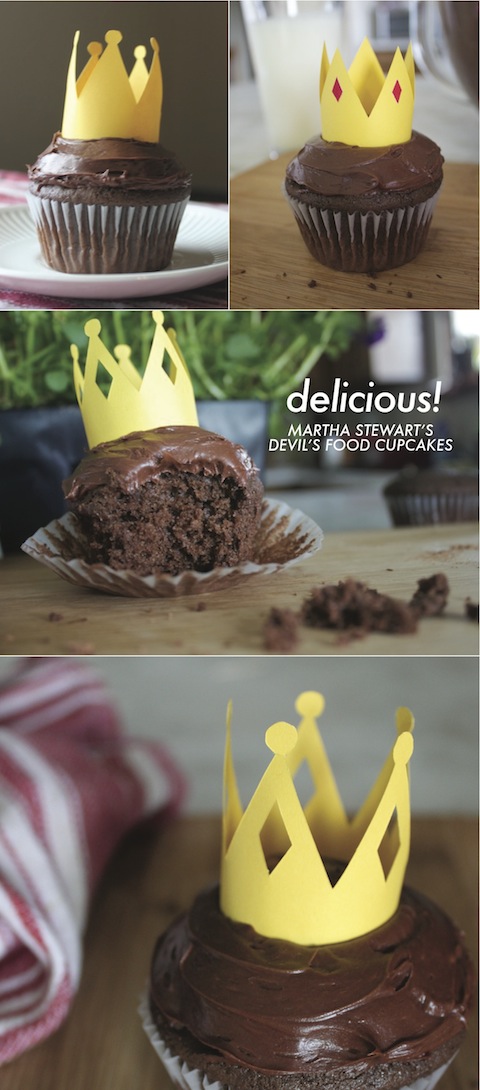
Good Monday morning to all of our favorite readers! We want to start off on this week ahead with a new (and remarkably easy) Father's Day craft. These mini DIY paper crown cupcake toppers are the royal icing on the [cup]cake for your dad's day this year. Show him how much he means to you by customizing his crown with precious jewels, a photo, or even a personal note. Make him feel like the king he is!

Materials:

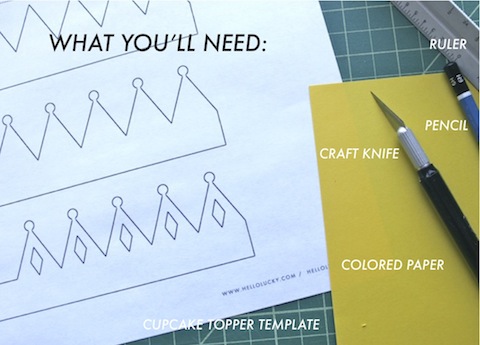
Colored Paper, craft knife, ruler, pencil, craft glue or tape (whatever you have around) and the cupcake topper template. Download below!

Cupcake Topper Template

How to:

Step 1. Print out the cupcake topper template.

Step 2. Trace the outline onto your colored paper. We've created three different designs - fit for all types of kings.

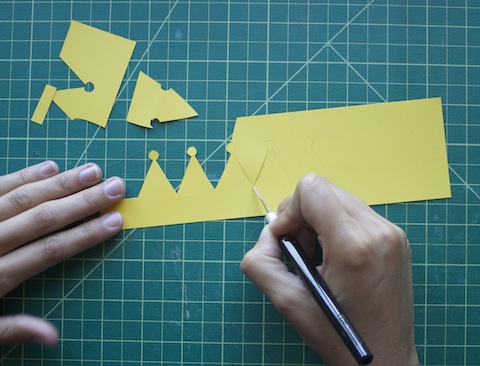
Step 3. Cut out your crown with a craft knife and ruler. This part takes time and patience!

Step 4. Place glue on the outside of the tab and secure to the inside of the crown.

Step 5. Display! We chose Martha Stewart's Devil's Food Cupcake recipe for a rich, flavorful treat. What dad doesn't love chocolate??

 Happy crafting!

For more great paper DIY ideas, visit our website here!
Spring DIY: Paper Flower Wreath

Spring may be a time to get organized, but we think it's a great time to bust out the dusty craft bins and get creative! There's no better feeling than recycling something disposable and transforming it into something worth saving. We know you're left with all those leftover holiday cards and wrapping papers, so this is the perfect opportunity to put them to good use! This lovely wreath from our book Handmade Weddings (published by Chronicle Books) uses a variety of found papers, including patterned paper scraps, kraft paper, glassine, tracing paper, and graph paper. This colorful wreath is perfect as a welcome sign at a wedding or party, or to adorn your front door as a welcome sign for Spring!

Materials

Makes 1 wreath

• 15 to 20 sheets assorted scarp papers e.g., construction paper, kraft paper, graph paper, tissue paper

• 30 to 40 colorful 1/4-inch brads

• Four 18-inch pieces floral wire (optional)

• One roll floral tape (optional)

• 1/4 yard scrap fabric

• 18-inch cardboard or particleboard wreath form

• Paper clip (optional)

• 1 to 2 pieces scrap cardboard or foam core

• 1 sheet text-weight paper (optional)

 Tools

• Paper Flower templates (available here)

• Pencil

• Scissors

• Small flower punches

• 1/8-inch hole punch

• Hot glue gun and glue sticks

• One 1 1/2-inch Styrofoam ball (optional)

• Inkjet printer, with extra ink cartridges (optional)

 How to

1. Make your flowers.

For flat flowers: Cut out the Paper Flower templates. Trace them onto patterned scrap paper, and cut out with scissors. Fold the flowers along the center axis of the petals to add dimension. You can also fringe the petals or crinkle flowers made of tissue to add depth. Punch small flower shapes for the flower centers. Stack several flower designs on top of each other, and punch a hole in the center. Insert a brad into the center and flatten the ends. Repeat to make as many flowers as desired.

 For cupped petal flowers: Cut out the Petal template. For each flower, trace the template four times onto graph paper or another text-weight paper. Cut the petals out. Slide a 6-inch length of floral wire into an unopened brad so that the brad grips firmly and the round end faces up. Fold the base of the petal into an M shape, position on the wire, and affix with a dab of hot glue. Place the next petal, and repeat until all four petals are in place. Wrap the petal bases with a strip of floral tape. Repeat to make as many flowers as desired.

 For tissue paper flowers: For each flower, cut four 1 1/2-×-4-inch strips of tracing paper or tissue paper. Place a piece of tissue, long side facing you, on your work surface. Center the Styrofoam ball on the paper, wrap the long ends up, and twist the ends to hold them in place. Trim the twisted ends with scissors and remove the ball, creating a cupped petal. Repeat to create four petals per flower. Slide a 6-inch length of floral wire into an unopened brad so that the brad grips firmly and the round end faces up. Position a petal on the wire, and tape it in place with a strip of floral tape, wrapping it around the wire a few times. Place the next petal and repeat until all four petals are in place. Repeat to make as many flowers as desired.

2. Prepare your wreath form. Cut your fabric into 3-inch-wide strips. Hot glue one end of a strip to the wreath form, and wrap it around the wreath until you run out of fabric. Glue the fabric end down and continue with a new strip until the wreath is completely covered. Avoid covering the hole in the wreath (for hanging). If desired, flatten a paper clip into an S shape and insert it into the hole, to be used as a hook when you are ready to hang your wreath.

3. Attach your flowers. Arrange your flowers in a wreath shape on your work surface. When you are happy with their placement, begin hot-gluing them to the form. To create depth, cut out several 1/2-inch squares of cardboard or foam core and affix these to the wreath form before gluing a flower on top, so that these flowers are slightly raised.

4. Add a sign (optional). If desired, lay out a sign such as “Welcome!” or your names and wedding date using a wordprocessing program and printing on text-weight paper, or write the sign by hand. Attach to the wreath using a dab of hot glue.

For more fun DIY ideas, visit our website here!